Guía del Usuario de SphereTester – Read this article in Spanish!
SphereTester User Guide
Introduction
SphereTester is an expert advisor that runs in the strategy tester of the MetaTrader 4 trading platform and it can simulate trading for any instrument on any timeframe. Using the buttons on the graphical interface you can send market or pending orders, modify, delete, close or partially close open orders. Using the input fields for stoploss, takeprofit and lot size you can change these variables at any time during the simulation. Enable News Events or Event Labels at any time and analyse the market conditions before entering into a position.
Please note that using SphereTester you have to manually open, close or modify orders, these processes are not and currently cannot be automated. Also please note that SphereTester cannot be used to test other MT4 Expert Advisors.
While the simulation lasts you can follow the changes in your account balance and equity on a graphical chart, actual values of your balance and equity are also displayed real time in the heading area of the order management panel.
Once you have finished testing you can view a detailed report (MetaTrader 4 standard functionality) with all the important parameters that can be used as a metric when developing a new trading system.
System requirements
Minimum: 1 GHz or faster 32-bit (x86) or 64-bit (x64) processor, 1 GB RAM (32-bit) or 2 GB RAM (64-bit)
Recommended: 2 GHz or faster 32-bit (x86) or 64-bit (x64) processor, 2 GB RAM (32-bit) or 4 GB RAM (64-bit)
Disk space: SphereTester uses less than 5Mb of data on your hard drive all you have to make sure is that you have enough space for historical data.
Before you start
Before you start please make sure that the following conditions are met on your pc and in your MT4 terminal:
- UAC has to be turned on
- SphereTester must be run in a standard MT4 installation (not portable)
- DLL imports must be enabled in the terminal
- Historical data must be available for the instrument and timeframe you want to run the test for
Installation
Your download will contain a zip file that contains the software (ex4 extension) in a compressed format. Please note that dll imports in the MetaTrader 4 terminal have to be enabled for SphereTester to operate correctly.
- Download the zip file and open it
- Right click on the ex4 file and select copy
- Open your MT4 Terminal and go to File/Open Data Folder
- Go to MQL4/Experts, right click and select paste
- Restart MT4 and SphereTester will be available in the Strategy Tester
- Select SphereTester and click on start
- Enter your licence key when prompted
The software is now installed and activated on your computer!
Historical data
Historical data must be available for the instrument and timeframe selected in the strategy tester for the period of the backtest. You can check the historical data available in your terminal for any instrument and timeframe by going to the History Center of MetaTrader 4 (Tools/History Center or by pressing F2). Select the instrument and timeframe you want to backtest on the left side and scroll down to the end of the results on the right side of the window. The date you see at the bottom of the list is the earliest date you have available historical data from.
There are different ways of obtaining more historical data and these are:
Download data from MetaQuotes
MetaQuotes is the company that develops the MT4 platform and they provide historical data for all major currencies and timeframes. You can download historical data from them directly from the download center. Simply select the instrument and timeframe you need the data for and click on the download button. A progress bar will run across the bottom of the window, wait until it finishes and then check the earliest date in the list. You can now run backtest for that instrument and timeframe from that date.
Please note that the MetaQuotes historical data is not very accurate and there can be holes in it, data is often missing for random periods of time.
Download data from your broker
Even when you use MT4 a lot, by default only a limited amount of historical data is downloaded from your broker to your pc. You can force download data from your broker by opening a live chart, turn off auto scroll and using the Page Down button scroll back into the past for as long as you can see new data added to the chart. The amount of data you can get this way differs from broker to broker but usually at least 2-3 years on the H1 timeframe.
It is a good idea to check the Max bars in History and Max Bars in Chart setting before you do the above and set these values to a very high number (millions if you want to be on the same side). If you skip to do this step you might not receive all available historical data from your broker because this limitation kicks in before you reach the end of the data. This setting is under Tools/Options/Chart in the terminal.
Request data from your broker or download from a third party
It is always worth asking your broker if they can provide you with historical data or check it on their website if they publish it in a downloadable format. A good example with complete description on how to download and import historical data can be found here:
http://www.earnforex.com/blog/quality-metatrader-historical-data/
Please note that if you don’t run your backtests using the Every Tick Model you have to generate data for other timeframes from the M1 data. A guide on how to do this can be found here:
http://www.fxdd.com/us/en/forex-resources/forex-trading-tools/metatrader-1-minute-data/
Alternatively a simple google search for MT4 historical data can reveal hundreds of websites where you can obtain historical data from.
Getting started
Once you have installed SphereTester and have historical data available go ahead and open the strategy tester within your terminal (View/Strategy Tester or Ctrl+R). Make sure that all of the following are set:
- Expert Advisor: select SphereTester from the dropdown list of available expert advisors
- Symbol: an instrument of your choice, make sure you have historical data available for the period and timeframe selected
- Period: the timeframe you want to use for the backtest
- Model: A testing model of your choice, see below for more details
- Use Date: this option has to be selected
- From Date: the start date of your test
- To Date: the end date of your test
- Visual Mode: this option has to be selected
- Speed slider: as a start set it to a medium setting, this can be adjusted during the backtest
- Optimization: make sure this option is NOT selected
This is everything you have to do to make SphereTester work in MT4, you can now have a look at the expert properties.
Expert Properties
Once you have set up the Strategy Tester click on the Expert Properties button on the left side of the window. Here you can configure the following options:
- TradesPerPage: this setting determines how many orders are shown on one page in the Order Management Panel
- Lot: set the initial lotsize for orders, this setting can be changed during the backtest
- StopLoss: set the initial stoploss level in pips for orders, this setting can be changed during the backtest
- TakeProfit: set the initial takeprofit level in pips for orders, this setting can be changed during the backtest
- Slippage: slippage for opening/closing orders, very rarely needs to be changed from the default value of 10
- Initial GMT Offset: the GMT offset of the historical data at the time of the start of the backtest
- HistoricNews: the number of news events in the past to be shown in the Events panel. Past events are displayed in grey for easier distinction from future events
- FutureNews: the number of news events in the future to be shown in the Events panel. Events are colour coded in the following order:
- White: all day events
- Green: events with a low expected impact
- Orange: events with a medium expected impact
- Red: events with a high expected impact
- SpeedControl: setting this option to false disables the built in speed control and only the default speed control feature of the Strategy Tester will be used
- Debug Mode: enable this option if you experience issues with SphereTester and check the Journal in Strategy Tester for error messages
Testing Models
One of three methods of data modeling can be chosen for testing, but it is always recommended to use the Every Tick option to ensure that the generated chart is as accurate as possible. The other options are Control Points and Open prices only but you should only use these as a last resort if you use a low spec pc and it struggles when the Every Tick option is selsected.
You can learn more about the modes of modeling in MT4 here: https://www.mql5.com/en/articles/1511
Activation
Before you can start using SphereTester you have to activate it using a Licence Key. Your licence key will be automatically issued and emailed to you upon successful checkout.
Start MetaTrader 4 and open the Strategy Tester (keyboard shortcut: Ctrl+R, Tip: you can also use this shortcut at any time during the backtest to hide the strategy tester window).
Select SphereTester from the list of Expert Advisors, a timeframe and instrument you have historical data for the period the period of the test (from/to dates, more information on historical data here), make sure that visual mode is selected and click the start button. A new chart will open and SphereTester will ask you for your licence key. Copy and paste your activation key into the popup window and click ok to proceed.
A message confirming the successful activation of your licence, or if there is an updated version of the software available confirming the update will appear and you are ready to use SphereTester.
Overview
SphereTester has three operational panels, and these are:
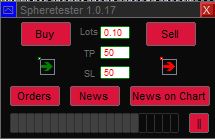
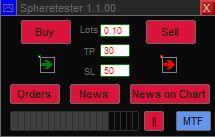
The Main Panel
As the name suggest, this is where most of the action happens, you can open new orders from here, change SL, TP and Lot settings for new orders, switch on other panels and control the speed of the backtest. For a detailed description on each function please see below.
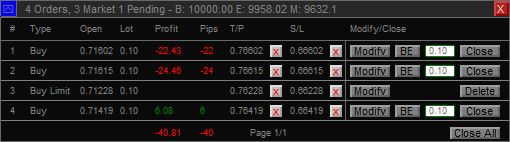
The Order Overview Panel
Here you are presented with a summary current Profit/Loss, number of open orders, account balance, equity and margin, detailed data about each one of your orders, and from here you can also modify and close orders. For a detailed description on each function please see below in the order management section.
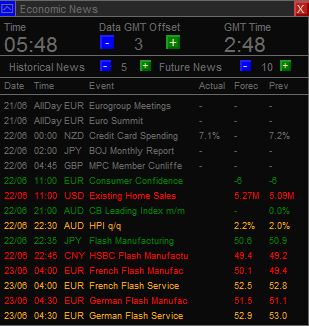
The Events Panel
This panel is used to display economic events in an easily readable format together with their impact, actual, forecasted and previous values. For a detailed description please see below in the Events Display section.
Each one of these panels can be minimised at any time during the backtest using the red x button in the top right corner of each panel. The panels can then be activated again using their corresponding buttons in the Main Panel or on the active chart.
Panels can also be freely moved around on the chart by clicking on the blue button in the top left corner of each panel, just hold the left mouse button down and move the panel to the desired position.
In addition to the operational panels SphereTester can display economical events as labels shown at the bottom of the chart. To enable this option click on the News on Chart button in the Main Panel.
Market Orders
To open a market order simply click on the Buy or Sell button in the main panel and an order will be opened instantly with the predefined StopLoss, TakeProfit and Lot size parameters.
You can manage the order afterwards in the Order Management panel, for details see below.
To change the predefined Stoploss, Takeprofit and Lot size see the Order Management section below.
Pending Orders
To open a pending order simply drag the corresponding arrow (green for Long, red for Short orders) near the Y axis on the right side of the chart. When it is close enough a horizontal line will appear that helps you position the opening price precisely, release the arrow and your pending order will be placed, from here on you can manage it in the Order Management panel.
In order to be able to drag and drop the arrows they have to be selected. By default both arrows are selected (you can tell this from the light grey border around them) but if it is necessary to select them again just double click on them and the light grey border will appear.
Order Properties
These are the text input fields in the middle of the Main Panel, and here you can change the Takeprofit, Stoploss and Lot size values at any time during a backtest. Parameters entered here take immediate effect and will be applied to all new orders. The initial values of these fields can be changed from the Expert Properties before starting the simulation.
- Lots: Enter the Lot size here you want to use for new orders
- TP: Enter the Take Profit level here in pips for new orders
- SL: Enter the Stop Loss level here in pips for new orders
Speed Control
The Strategy Tester of MetaTrader 4 has a built in speed control feature but it is not performing very well on the fastest setting. 32 is the fastest setting and when used it is impossible to manually process what is happening on the chart because it is simply too fast, the lower 31 setting is however too slow in some scenarios. This led to the new speed control feature to be introduced in SphereTester, simply set the speed in the Strategy Tester to the maximum 32 and slow it down gradually using the speed bar.
When on the fastest setting the speed will be the same as if you were using Strategy Tester on setting 32, by changing the setting you can very finely slow down the chart to your preferred speed.
Use the pause button to pause and continue the simulation at any time. This feature also means that you don’t have to have the Strategy Tester window open during the backtest, simply minimise it using the Ctrl+R keyboard shortcut and you will have more space for your chart but still can pause the testing.
Custom Timeframes
Multi timeframe backtesting is supported from version 1.1.00. MTF charts are generated from the data on the main chart using a multiplier. The multiplier has to be an integer number and the timeframe of the main chart is simply multiplied by it to create a new timeframe.
Examples:
- Using M1 as your main timeframe you can generate any other timeframe greater than or equal to M1. Use 1 as a multiplier to generate another M1 chart, 2 to generate an M2 chart, 3 to generate an M3 chart and so on.
- Using M15 as your main timeframe you can generate, M15, M30, M45, H1, M75, M90, M105, H2 charts and so on.
The new chart is saved as an offline chart in MT4 and the Symbol has an _ST suffix in the name of the chart. For example if your main chart is GBPUSD M15 and you use a multiplier of 3, the generated chart will show up in the list of offline charts as GBPUSD_ST M45.
To open a chart with a timeframe different from the main chart click on the light blue MTF button on the Main Panel.
A popup will open, enter the timeframe multiplier you wish to use and click on OK. The Open Offline Chart window will automatically open, find the chart you have just generated and double click on it to open or highlight it and click on the open button.
A new chart window will open with the custom timeframe you have generated and it will be automatically updated with new tick data whenever the main chart is updated. You can then apply your indicators or templates to the new chart and use it like any other chart.
It is important to notice that orders will not be shown on the offline chart, only on the main chart and orders can only be opened from the Main Panel of SphereTester on the main chart.
Order Management
All active orders are listed in the Order Overview Panel and this is where you can close or modify orders. Orders are in an ascending list, the oldest orders are at the top of the list and new orders will be added to the bottom. If the number of orders exceeds the OrdersPerPage setting, pagination arrows at the bottom of the panel will appear, use these to find and any one of your orders.
In the header of the Order Overview Panel you can see a summary of the number of orders open, broken down by pending and market orders, current account balance, margin and equity.
The left side of the panel provides you with information about the orders such as order type, order open price, lot size, profit and profit in pips.
On the right side of the panel you can perform operations with the orders and these are:
- Deleting Stoploss/Takeprofit levels
Click on the red X button next to the StopLoss or Takeprofit value and the Stoploss/Takeprofit level for the selected order will be removed. - Setting or reinstating Stoploss/Takeprofit levels
If you have mistakenly deleted the Stoploss/Takeprofit levels you can simply reinstate them kby clicking on the + button next to the StopLoss or Takeprofit value and the Stoploss/Takeprofit level for the selected order will be set. The value for the SL/TP to be set comes from the Main Panel and is applied to the current price (not to the order open price). - Modifying Stoploss/Takeprofit levels
You can easily modify the Stoploss/Takeprofit levels for any order by clicking on the Modify button. Two vertical lines representing the Stoploss and Takeprofit levels will appear on the chart (blue line for Takeprofit and red line for Stoploss), just drag and drop these to the levels you desire and click on the accept button. Don’t worry if you don’t see an accept button in your Order Management Panel, it only appears after you have clicked on the Modify button.
In addition to the above when you modify a pending order a yellow line will also appear, this represent the order open price. As above you can simply drag and drop the line to a new level and click the Accept button to save the changes. - Break even (BE button)
Once an order is in profit you can use this button to quickly set the stoploss level to the order open price. - Close an order
To close an order simply click on the Close button for that order. - Partially close an order
To partially close an order enter the number of lots you want to close in the input field right to the close button and click on close. The selected number of lots will be closed and the remainder will stay open.
Events Display
This panel is used to display economic events in an easily readable format together with their impact, actual, forecasted and previous values. Events are colour coded in the following order:
- White: all day events
- Green: events with a low expected impact
- Orange: events with a medium expected impact
- Red: events with a high expected impact
In order to be able to use the Events display effectively you have to know the exact GMT Offset of your historical data for the period of your backtest. If your backtest is for a long period of time you also have to know if and when the offset changes and adjust the setting accordingly in the top section of the Events panel.
Once the GMT offset is set, the Events panel will display the adjusted GMT time and also the time of the economic events will be adjusted to reflect the offset.
In the section below you can adjust the number of Historical and Future News Events to be displayed in the panel, set these numbers as low or as high as you like.
Event Labels
The same rule applies as above, you have to know the exact GMT Offset of your historical data in order to be able to use this feature effectively. Colour coding of the labels is the same as above and to see details of the event simply hover over the label with your cursor.
Updates
Software updates are automatically downloaded when a new version is released if an active internet connection is present. If a connection cannot be established to the server or your computer is in offline mode SphereTester will still work but you won’t receive any updates until the connection is restored. Whenever a new version is downloaded you will see a notification in MT4 informing you about the new version and you will be prompted to restart your terminal.
News Event updates are automatically downloaded when a new update is released if an active internet connection is present. News event updates are released periodically, usually every four weeks. If a connection cannot be established to the server or your computer is in offline mode SphereTester will still work and display news events but you won’t receive any updates until the connection is restored.
Troubleshooting
If you come across an issue while using SphereTester please make sure you check the Journal tab of the Strategy Tester. All errors, warnings and notifications are displayed here and seeing the error message might give you a clue what the cause of the problem could be.
Enabling the Debug mode in the Expert Properties gives you enhanced error logging, use this is you feel that there is a problem with SphereTester.
If you experience any issues while using SphereTester please do let us know and log the problem in our Support Forums.